Delivered in the box
The main box includes XR glasses, a controller with the Keppy app pre-installed, and an accessories box.

XR Glasses & Cable

Controller holder

Controller with
installed Keppy App
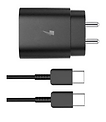
Fast power adapter withUSB-C type cable
System Assembly
1
2

1. Connect the controller to a power source using the charger and USB-C cable provided in the accessories box.
Press and hold the power button on the controller to turn it on.

2. Use the cable provided in the XR glasses box to connect the XR glasses to the controller.
Ensure that you use ONLY the cable from the XR box for this connection.
Plug the cable into the correct port on the
controller, which is marked with a glasses icon.

3
3. Inside the accessories box, locate thecontroller holder. Attach the holder securely tothe controller, ensuring it does not press anybuttons on the sides of the controller.
Note: The holder has a 1⁄4” hole, which is compatiblewith most camera and electronics attachment systemsand stands.
Note: The pole mount mechanism is not included

Done! The system is now installed. Next, Let’s set up the Keppy Application.
Keppy Application Configuration
Keppy App is part of an augmented reality-based dental patient distraction system, pre-installed on a controller included in the delivery box.


Keppy App icon on the
Desktop of the controller.
1
1. Connect to the Internet
Before starting, ensure that the controller is connected to a WiFi network with internet access. To connect to WiFi, open the upper menu by sliding your finger from the top to the middle of the screen.

2
2. Select the 'Internet' button, and the WiFi network search menu will appear. Please find your network name to connect to it.
Note: The minimum speed requirement for your internet connection should be 15 Mbps. For optimal performance, the WiFi router should be located close to the Keppy system.
*Internet speed test app

ATTENTION!
Please turn ON the 'Auto-rotate' function on the controller from the top menu.
3
3. Account Activation
The controller comes with the KeppyVR app pre-installed. To launch the application, click on the icon on the controller's desktop.
For first-time users open the applicationand click ‘activate the product’on the login page. Complete the form and enter the “activation key” to create your KeppyVR account. You can find the activation key on the one-pager included in the main box.


ATTENTION
The activation key is printed on the one-pager included in the main box.

After completing the onboarding process, rotate the controller into portrait mode and attach it to the dental light arm or place it on a stand near the patient.
After completing the onboarding process, rotate the controller into portrait mode and attach it to the dental light arm or place it on a stand near the patient.

4
4. Patient onboarding to the system is initiated by scanning a unique, system specific QR code with the patient's smartphone.
There are 3 onboarding options available.

Option 1
Onboarding from the Waiting Area
The unique QR code is printed and displayed in the waiting area for patients to scan.

Option 2
Onboarding from the Dental Chair
The patient scans the unique QR code displayed on the right side of the controller’s screen.

Option 3
Onboarding from Home
The QR code link is sent to the patient before the procedure via email, SMS, or included in reminder CRM text.
Once the patient scans the QR code or clicks the link, they will go through the system registration process for preferred content selection. The patient can either choose content from the provided list or select a preferred video from YouTube.


When the patient selects the content, a unique QR code and a 3-digit code are generated.
The patient can then scan the QR code with the controller OR enter the 3-digit code (manual) to enable video streaming.


Now you have a QR code.
1. Sit in the dental chair.
2. Scan the QR code with your smartphone using the controller's selfie camera.
3. Wear the AR glasses.
4. Enjoy your dental experience!
Keppy App is ready—you can now onboard patients. Next, let’s set up Automated Review Requests.
Configure Automated
Review Request (Yelp/Google)
Set the Beam Pro controller to vertical mode and Press the Menu button in the top-right corner and select SMS Template.

To Connect YELP
1. Enable the SMS Service by switching toggle.
2. To link your business Yelp page, tap the
Yelp icon (this will open the Yelp webpage).

To connect your business Yelp account:
1. Type your business name in the search field.
2. Click the Write a Review button on your business page.
Copy the Write a Review page address bar URL and paste it into the Keppy app.
To verify, press the Test button to ensure the setup is successful.
DONE!

To Connect GOOGLE
1. Enable the SMS Service by switching toggle.
2. To link your business Google reviews page, tap the Google icon (this will open the Google Map page).


To find your business Google reviews account, type your business name in the search field.
If your business is not on google map follow the link
How to add or claim your Business Profile on Google
1. Click the Review button/tab on your business page.
2. You will be prompted to log or new window will be opened.
3. Copy address bar URL and then Paste it into the Keppy app.
To verify, press the Test button to ensure the setup is successful.
DONE!
Congretualtions!
You have successfully linked your Google Reviews OR Yelp account to the Keppy applicationTo complete the setup, please rotate thecontroller to portrait mode.
For any questions, please contact